Info
| Name | Inventory Billing Management Script |
| Market | codester.com |
| Category | Finance |
| Tags | css, html, Javascript, php, sql |
Overview


Demos:
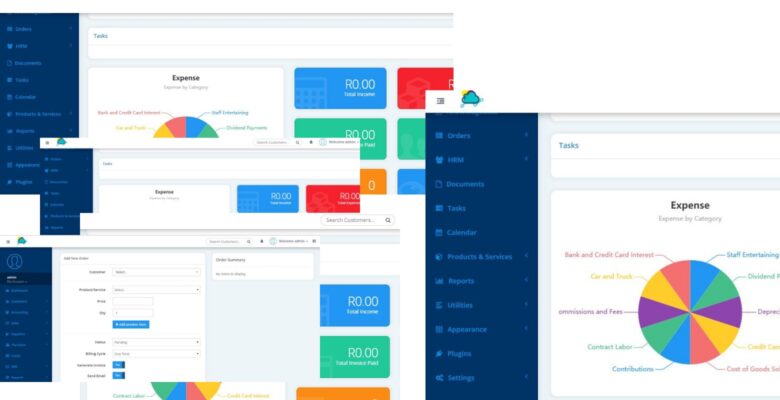
Admin side
Url: http://www.meltscloud.co.za/$/demo/?ng=dashboard/
password:1234
username: [email protected]
CLIENT SIDE
http://www.meltscloud.co.za/$/demo/?ng=client/login/
USER: [email protected]
password: 1234

Features
- Contact Management
- Contact Activity
- Contact Profile with Image
- Send Email directly from Portal
- Full Featured Ajax Quick Invoicing
- Create Recurring Invoice
- Send Invoice Payment Reminder & Payment Confirmations
- Collect Payments with Payment Gateway
- Track Income, Expense
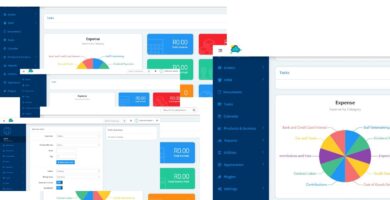
- 8 Reporting Tools
- Beautiful Dashboard for quick snapshot for your Business
- Logs for Audit
- Supports Multiple Users
- Fully Branded, No Powered By, No Copyright Notice
- One Click Database Backup
- Optimized for best performance
- Tested by generating millions of random transactions
- Supports to send email using SMTP
- Customizable Email Templates
- Tag in Customer Accounts, Transactions etc.
- Contacts, Customer Notes
- Email M
Requirements
Most current web servers with PHP & MySQL installed will be capable of running iBilling.
Minimum Requirements
- Linux / Windows / Mac OS
- PHP Version 7+
- Both PDO & MySQLi Support
- GD2 Image Library
- MySQL Version 5.7.x or above
Instructions
With Built In Auto Installer
1. Unzip the contents of the zip file to a folder on your computer. You will find two folders, One folder contains documentation & another is ibilling.
2. Upload the Entire ibilling folder to your website / server
3. Next you can rename the folder to whatever you like (billing, finance, manage etc..)
4. Now visit the uploaded location using your web browser to run the installer process.
5. Follow the instructions on screen to install iBilling.
On Successful Installation, You will be redirected to Settings Page to change Username & Password.
6. For security, Delete the install directory inside application folder.
7. If you see blank page after installation, it might be your compiled folder permissoon is not writable. Please make permission 755 compiled directory inside ui folder to store the generated contents from theme.
Manual Install
To install manually, follow this steps-
1. Unzip the contents of the zip file to a folder on your computer. You will find two folders, One folder contains documentation & another is ibilling.
2. Upload the Entire ibilling folder to your website / server
3. Next you can rename the folder to whatever you like (billing, finance, manage etc..)
4. Sample config file is available here- application/config.sample.php . Rename it to config.php & put it in same location (/application/config.php) Open config file using a text editor & Put the database info and url.
5. Import database. Database file is located here- application/install/primary.sql
On Successful Installation, You will be redirected to Settings Page to change Username & Password.
6. For security, Delete the install directory inside application folder.