Overview
– Built on Xcode 11 with Swift 5.
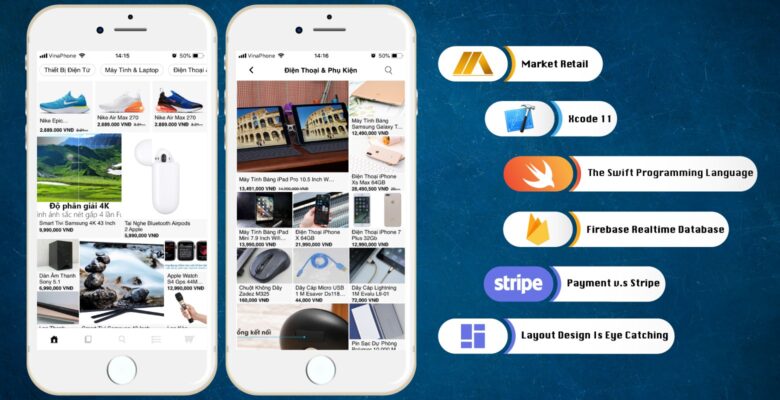
– Market retail is shopping app used for mobile devices.
– With safe and useful sell-buy features.
– Integrated with online payment service with Stripe or COD service.
– Layout design is eye catching, provides quick and convenient shopping experiences with user friendly interface.
– Update order status frequently.
– Update promotion and sale-off date to date.
– Search product by categories and add up products from all categories such as fashion, cosmetics, smart phone, electronics, mom & baby products, online bookstore,…
– Market retail is written by Swift programming language that combines the best in modern language and high security. App is developed with Firebase database.
– You will be satisfied to use Market Retail,..
Features
– Built on Xcode 11 with Swift 5
– Integrate Firebase database
– Integrate Stripe
– Layout design is eye catching
– ..etc,…
Requirements
Request:
+ macOS Catalina(10.15).
+ Xcode 11 (Latest Xcode)
Instructions
https://drive.google.com/open?…
https://drive.google.com/file/…
A. Register the project with Firebase database.
– Access https://firebase.google.com/.
– Log in with your gmail account.
– Click on “Go to console”.
– Click “Add project”.
– Name the project.
– Click “Continue”.
– Continue “Continue”.
– Agree to the terms of Firebase, select “Create project”.
, … Waiting for completion, …
– Click “Continue”.
– Select “iOS”.
– Open the project with Xcode.
– Enter “iOS bundle ID”. Taken from the “Bundle Identifier” in projet.
– Click “Register app”.
– “Download GoogleService-Info.plist”.
– Click “Next”.
– In macOS. Select “Terminal”.
– Install “Cocoapod”.
– Copy “sudo gem install cocoapods ” and paste it into “Terminal “. Enter -> Enter the password for the system to install itself.
– After installation is complete. Inside Terminal click:
cd -> Drag the path from the directory containing the project Market Retail -> Enter -> Enter ls -> Enter.
– Continue, enter “pod install” -> Enter. Wait for completion.
– After running. Select “Market Retail.xcworkspace” to open.
– Inside Market Retail/Resources/…
– Delete the old “GoogleService-Info.plist” file. And drag the new “GoogleService-Info.plist” file that just downloaded into the project.
– Select “Copy item if needed”. Check “Create folder references”. And check “Market Retail”. For the file to be copied into the project. After finishing press “Finish”.
– Press “Command + B” or Product/Build. To check if the project has an error?
B. Podfile.
– Stripe is integrated into the project using localhost. Intended to use for checking the operation of the payment feature.
– You can install it on your computer.
– First, go to https://www.mamp.info/en/ and download MAMP to your computer. Then click to install.
– Installation is complete. Click on MAMP to launch. Then click Start Servers, MAMP will connect to Apache Server and MySQL Server.
– Go to google.com find the keyword “stripe php”. Download the zip file to your device.
– Decompress, we will see the folder “stripe-php”.
– Copy the “stripe-php” folder into: Application/MAMP/htdocs.
– We will have the path “http://localhost:8888/stripe-php/”. When we enter will see the file in the directory stripe-php.
– In the “stripe-php” folder open the “payment.php” file with Atom or any software that supports *php files.
– In “payment.php” we will see a key: sk_test_LC….
– Go to Stripe.com. Register an account or Log in.
– Inside the interface. Developers/API keys/Reveal test key token. We will see 2 keys. 1 is Publishable key and Secret key.
– Copy the Secret key and paste it into “payment.php”.
– Copy the Publishable key and paste it into Market Retail/AppDelegate.swift.
– Inside Market Retail/Tab Cart/BillingInformationTVC.swift/”func tokenToStripe(_ token: STPToken) {}”.
– Copy the localhost path we just accessed, paste in the project. Save and run the project.
– You can watch the video to see the details.