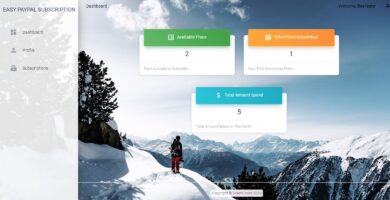
Overview
We have developed very easy to integrate and ready to use script without any heavy SDK to integrate the Paypal recurring payment or subscription. The Codebase has very straightforward class and also bundled in flask with GUI. Just fill out the merchant details in config file as detailed in the README file and your subscription feature is ready to go live. You can even integrate the simple class into your existing python application.
Features
- Easy to integrate, Configure the config file and its ready to go
- Readymade GUI in Flask as starting point of your new application in flask
- Subscription amount, currency are customizable by admin
- Admin and normal user GUI interface
- Minimal files
Requirements
Please follow the readme file to setup in your existing or new application. We have prepared a very basic requirement.txt file which will install all the dependencies. Tested in python 2.7+ or python 3
Instructions
Steps to setup the application:
1. Unzip the application archive and open the terminal.
2. change the directory to go to extracted folder.
3. Its better to run the python applications in virtual environment. For this, to create a virtual environment run: python3 -m venv venv. (Application is tested in python 3.6)
4. Activate virtual env: source venv/bin/activate
5. To install the required dependencies, run pip install -r requirements.txt
6. To create postgres database run: psql [This will enter you to the postgres console with current user. You can create database with new username as well.]
7. Then run: create database db_name; Make sure to put semicolol at the end and you get the output, CREATE DATABASE as success.
8. Open config.py file of project root to connect your postgres database.
Change ‘user’, ‘pw’, ‘db’ as per your database setup.
9. From your paypal developer account, find client_id and client_secret for your application and change in config.py. You can get the required keys from, https://developer.paypal.com/d…
10. Configure your smtp server of your choice to send email out from the system.
11. To create the required postgres database and tables run the following command from project root:
python manage.py db init
python manage.py db migrate
python manage.py db upgrade
12. At last run: python app.py [This will run the application in default 5000 port and can be accessed locally from http://0.0.0.0:5000/. You can run it in any port by editing app.py and run in wsgi in port 80 for production.]
13. Sign for the service for a normal user, log in and route to 0.0.0.0:5000/adminuser to create a admin user. This will create the admin user one time. Other users can normally register from gui.
14. To log in as Admin user use email:[email protected] and password: admin123